
Although these are rares cases, you might have some scenarios where you want to modify something on the system before you install your MSIX package. One example that I’ve stumbled upon was a user who had old MSI versions installed on the machine and these left a lot of user data behind after the uninstall.
The problem was that the MSIX package let’s your application read from the required folders on the machine, meaning if you have old settings saved in %appdata%, it is possible that when you open up your MSIX package, this will read all the settings and it’s not something you would like.
One other exampled that I’ve seen is when a user had an app which was reading some settings from the HKLM registry, and he did not wanted that registry to be captured in the MSIX package, because it was dynamic on each machine and he wanted to control it via 3rd party infrastructure tools.
In both cases, there is a workaround that you can use to modify your system before installing the MSIX package, and this is PowerShell combined with 7Zip SFX Maker. You might ask…why bother to create an EXE wrapper over a PowerShell script? The answer is easy: most users don’t have a clue what PowerShell is, and they are used to see .exe files when it comes to installers.
Now, let’s see how we can create an EXE installation wrapper over an MSIX with 7ZIP SFX Maker.
Step 1: Create the PowerShell script
If you have your MSIX already prepared, you need to do the PowerShell script that installs it and modifies the system as you desire. For this example I’ve created a simple PowerShell script that deletes a folder called MyDirectory from %appdata% before installing the MSIX package. The script contents are:
$DeleteFolder = $env:APPDATA + "\MyDirectory"

Remove-Item -Path $DeleteFolder -Recurse -Force

$scriptPath = split-path -parent $MyInvocation.MyCommand.Definition

$InstallationPath = $scriptPath + "\Environment Variables Test-x64.msix"

Add-AppPackage -path $InstallationPath
Step 2: Archive the PowerShell script & MSIX Package
Step 3: Create EXE with 7Zip SFX Maker
 In the Files tab, click on the Plus button and select the previously created 7z archive.
 In the Dialogs > General configure a Title for the installation, set it to Overwrite all files and check Extract to temporary folder. Also you can check Show SFX icon in Begin, Finish and Cancel Prompt.
 In the Dialogs > Begin Prompt tab, check Begin promp and write a desired message. In my case I wrote Start Installation?
 In the Dialogs > Extract path deselect Allow user to change path. I want the archive to always be extracted in %temp%. If you want you can change this, but you must also change another step which i will get to later on.
 In the Tasks tab, click on the Plus button and configure it as follows:
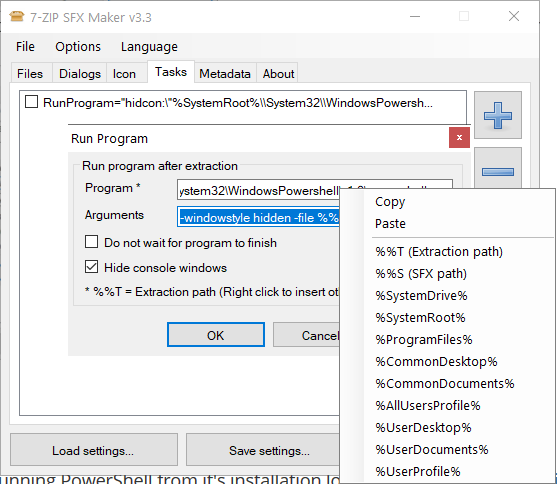 As a last step, click Make SFX.


